
Your Trusted Cloud Friend: The AWS Management Console
Amazon Web Services (AWS) offers a wealth of services and tools for developing, deploying, securing, and managing apps and services on the cloud. This “wealth,” however, can make it challenging to gain visibility into performance, usage, and costs, especially for organizations with multiple AWS accounts and numerous self-provisioning users across diverse lines of business.
To address these challenges, AWS provides the AWS Management Console, a free-of-charge web-based app for single-pane management of AWS accounts, services, and users. In some Regions, the AWS Console is also available as a mobile app. The jury is out on its user interface—some reviewers like it; others find it hard to use. Certainly, anyone used to the user-friendly centralized control panels of web hosting platforms like Plesk or cPanel will find the AWS Management Console daunting at first.
This post aims to demystify the AWS Management Console, in the hope that it will become your best friend as you manage your AWS deployments. And learn more about how Media Temple can help you migrate to the AWS Cloud and navigate the AWS Management Console!
Getting Started
When you first access the AWS Management Console for your account, the home page will look something like Figure 1 below. The different sections of the AWS Console home page are portals through which you can navigate to AWS services, solutions, and learning resources, as well as to third-party tools in the AWS Marketplace.

Figure 1: The AWS Management Console Home Page
Services
From the AWS Management Console, you can access the consoles and dashboards of the various services you are using in your AWS deployment. In this section, we describe how to navigate to a service, and we look at a typical service console using IAM as an example.
Navigating to a Service
There are a number of ways that you can navigate to a service dashboard from the AWS Management Console (Figure 2).
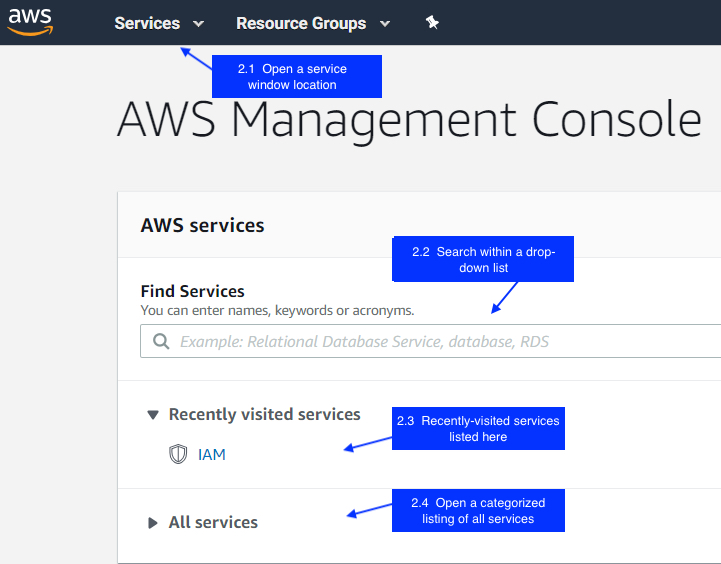
Figure 2: Navigate to Services
You can click Services in the navigation bar (Figure 2:1) to open a service location window as shown in Figure 3. There you can..
A. Conduct a text search for a service.
B. Choose to view the services grouped in categories or in alphabetical order.
B. See a history of recently visited service consoles
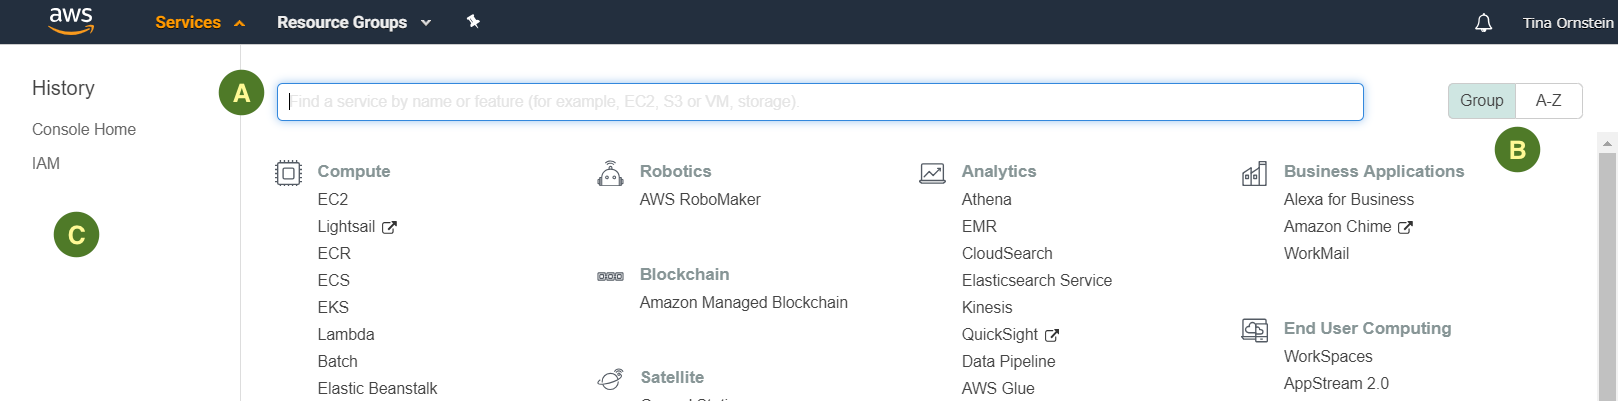
Figure 3: Service Location Window
You can also click inside the Find Services text box (Figure 2:2) to open a drop-down alphabetized list of all services, and then either scroll to the desired service or use text search to narrow down the list.
There are also two convenient shortcuts for navigating to often used services. The first is provided by the AWS Console itself, which keeps a list of recently visited services (Figure 2:3). The other is the ability to pin a service to the navigation bar by clicking the Pin icon to open an alphabetized listing of services, and then dragging the service’s icon to the navigation bar. You can unpin a service by clicking the Pin icon and dragging the service’s icon off the navigation bar.
Figure 4: Services Pinned to the Navigation Bar
Selecting All services (Figure 2:4) opens a window of all services similar to the one that opens when you click Services in the navigation bar. The only differences are that the view is always categorized and there is no history of consoles recently visited.
Sample Service Console: AWS Identity and Access Management
AWS Identity and Access Management (IAM) is an important security service that lets you define and manage role-based access to AWS resources and services. Here we use IAM as an example of what a service-specific console looks like in the AWS Management Console.
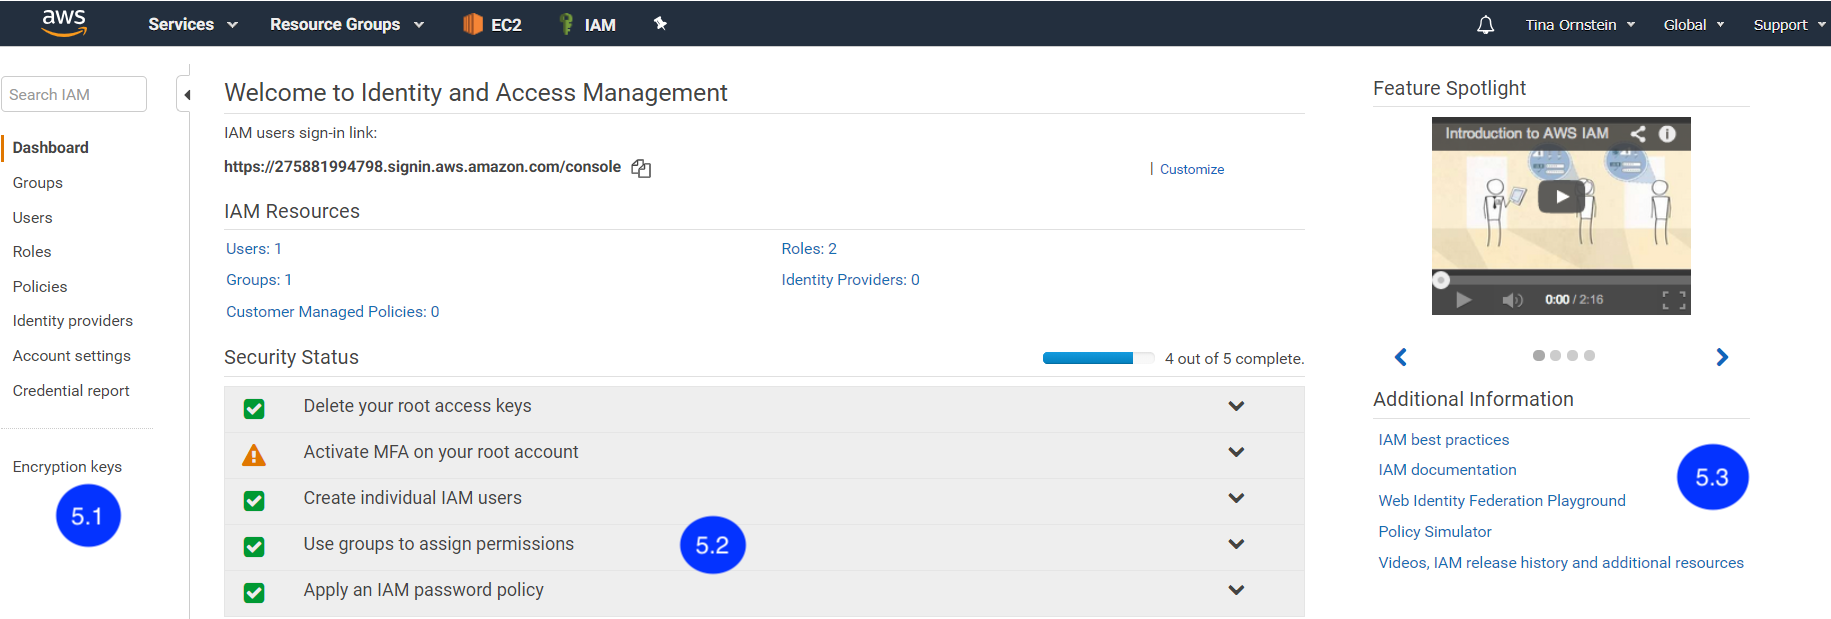
Figure 5: IAM Service Dashboard
On the left (Figure 5:1), there is a service-specific menu of the various elements to be defined and managed within the IAM service (groups, users, roles, and so on), with the dashboard being the home page of the service.
In the center (Figure 5:2) is an at-a-glance dashboard of the IAM resources defined to date and the Security Status as defined by five key steps (illustrated in Figure 6 below).
On the right (Figure 5:3), there are links to service-specific information and resources, such as a video introduction, best practice guidelines, and a policy simulator.
 Figure 6: Closeup of the IAM Dashboard
Click a step to view an explanation and a button for accessing the relevant functionality, as shown in Figure 7 for Create individual IAM users.
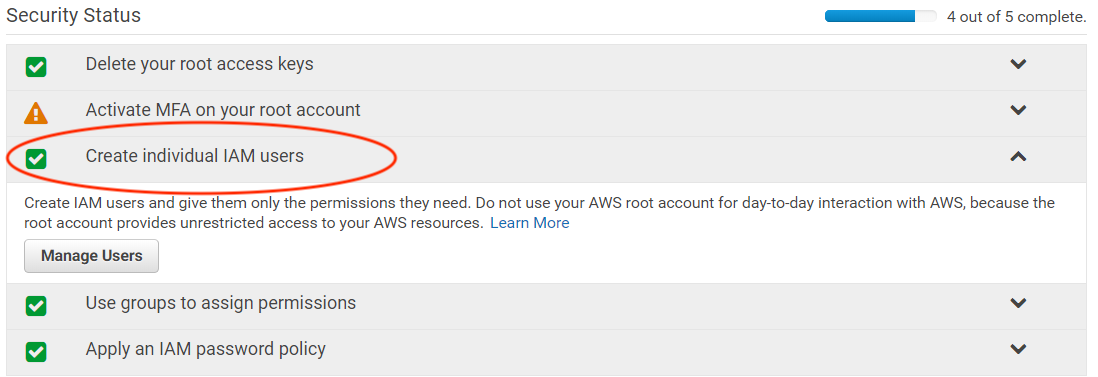 Figure 7: Security Status
In each case, the interface for adding, deleting, or modifying users, groups, policies, and so on guides you step by step through the required actions, many of which are point-and-click.
Resource Groups
An AWS resource is an entity that you can work with, such as an Amazon EC2 instance or an Amazon S3 bucket. A resource group is any number of resources in the same Region that all match the same query criteria. The criteria can either be that the resources have all been assigned the same user-defined tag or that they all belong to the same AWS CloudFormation infrastructure stack.
Resource groups are really useful for getting insights into or applying an action to related resources. Thus, for example, you can use resource groups to apply updates or security patches to a collection of Amazon EC2 hosts, or you can collect, monitor, and view data for all the relevantly tagged Amazon EC2 instances in a particular application layer.
You can view saved groups, create groups, and edit tags through the drop-down Resource Groups menu on the AWS Management Console navigation bar. Selecting any option opens the AWS Systems Manager console, as shown in Figure 8 below.
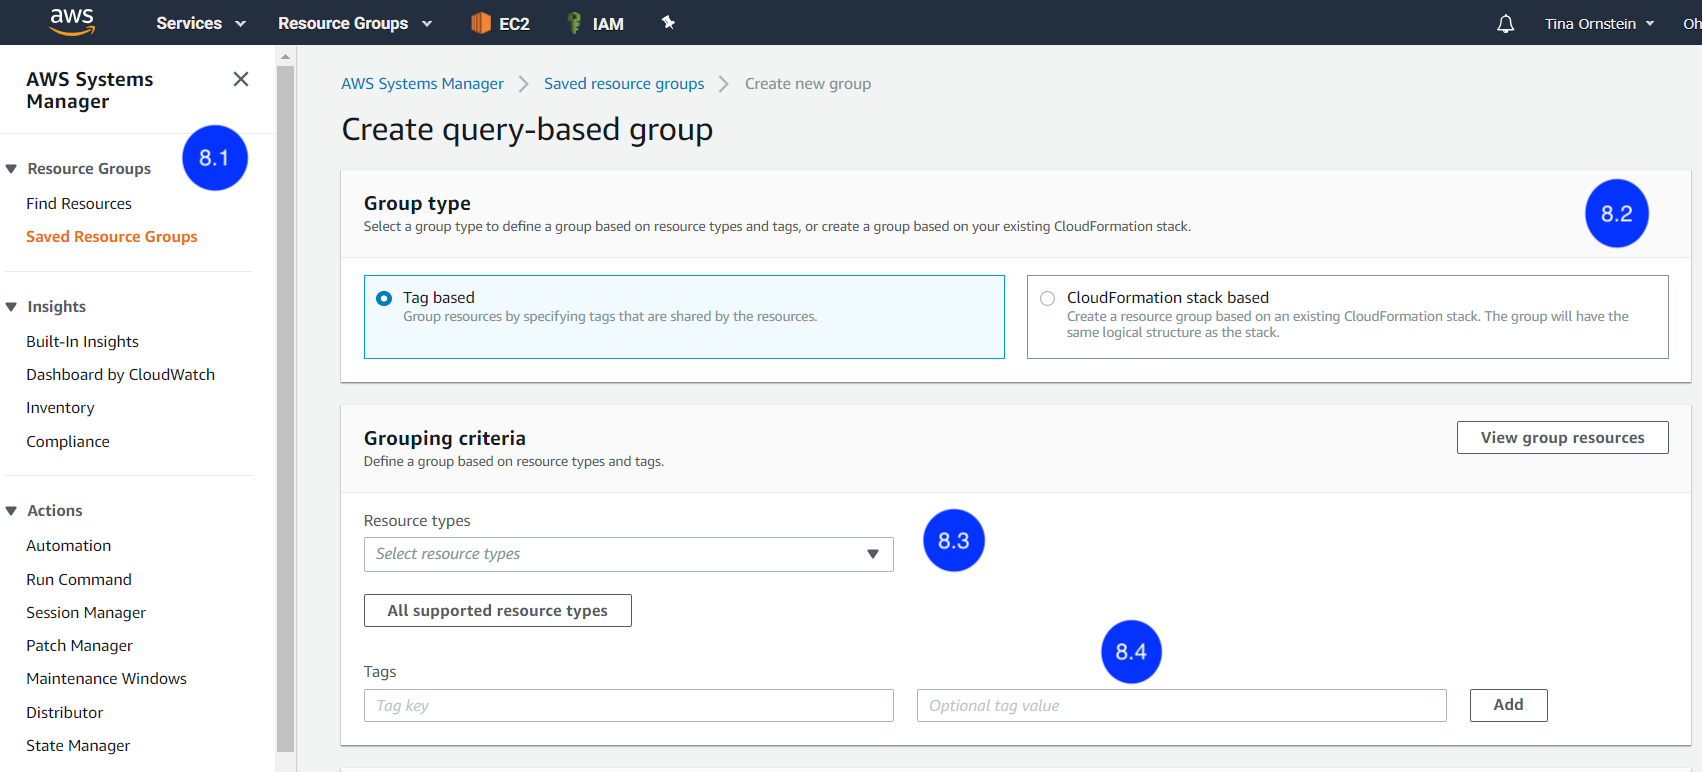
Figure 8: Creating a Query-based Group
The AWS Systems Manager navigation pane (Figure 8:1) provides easy access to creating, managing, and applying actions to resource groups. When creating a group, you start by specifying the query criteria (Figure 8:2) as tag-based or CloudFormation stack-based. You then define the grouping criteria by selecting the relevant resource types (Figure 8:3) and adding the desired tags (Figure 8:4). Although not shown in Figure 8, the next steps are to select the provisioned resources that you want to include in the group, give the group a name, and provide a group description and add group key/value tags (optional).
Regions
The AWS cloud is deployed across 20 geographic Regions around the globe. The Region(s) on which an AWS service is deployed can have a significant impact on cloud costs since service charges differ from Region to Region (and sometimes even on Availability Zones within the same Region). The Region in which an app is running can also affect data latency and other app performance indicators. In addition, in some sectors, there are regulatory restrictions regarding the countries or Regions in which cloud resources are deployed, so choosing AWS Region(s) can also be a compliance issue.
Some services, such as IAM, are global. Most AWS services expect you to specify a Region endpoint when accessing the service, although some, such as Amazon EC2, allow you to not explicitly specify a Region endpoint. In these cases, the AWS default is the us-east-1 region.
It is important to remember that the resources provisioned in each Region are independent of each other. Companies often take advantage of this for high availability purposes (i.e., maintaining redundant failover sites in one or more Regions). But it also means that at any given point in time, the AWS Management Console is only showing the services that are relevant to the currently selected Region, as seen on the left side of the navigation bar. When you navigate to a service deployed in a specific Region, the Region in the navigation bar updates automatically and will remain in that Region until you click the arrow to select another Region.
Billing
Through the AWS Management Console, you also gain access to the Billing and Cost Management dashboard. This free-of-charge AWS service provides all the tools needed for real-time visibility into AWS usage and costs, including an estimate of the month-to-date billing charge and the month-to-date spend by service, as shown in Figure 9 below.
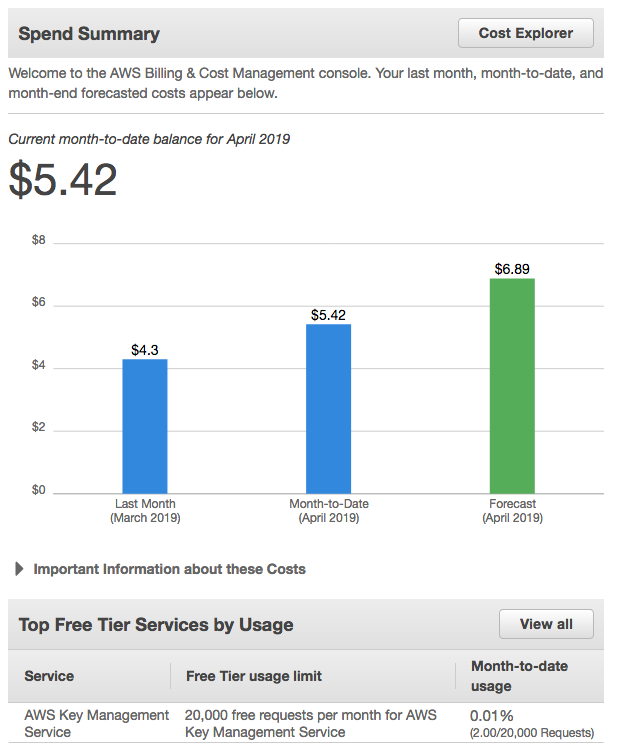
Figure 9: Spend Summary
Understanding AWS billing charges and patterns over time is a crucial first step in containing and optimizing cloud spend. For example, you may discover that automated workflows are not effectively terminating provisioned resources that are idle. Or you may discover usage patterns that lend themselves to discounted payment opportunities, such as prepayments or reserved instances.
Understanding all of the many features of the Billing and Cost Management dashboard is beyond the scope of this article, but we highly recommend that you take the time to review the AWS documentation on the monthly bill in general, and on the dashboard in particular.
Final Note
The AWS Management Console can become a very handy tool and a best friend when spending time in the AWS Cloud. The Management Console is a powerful and well-supported tool for unified and granular management of your AWS resources and services.
Learn more about how Media Temple can help you migrate to the AWS Cloud and navigate the AWS Management Console!